
How I Fixed a Self-Signed SSL Certificate in CyberPanel Using SSH (Step-by-Step Guide)
Have you ever opened your website and seen messages like:
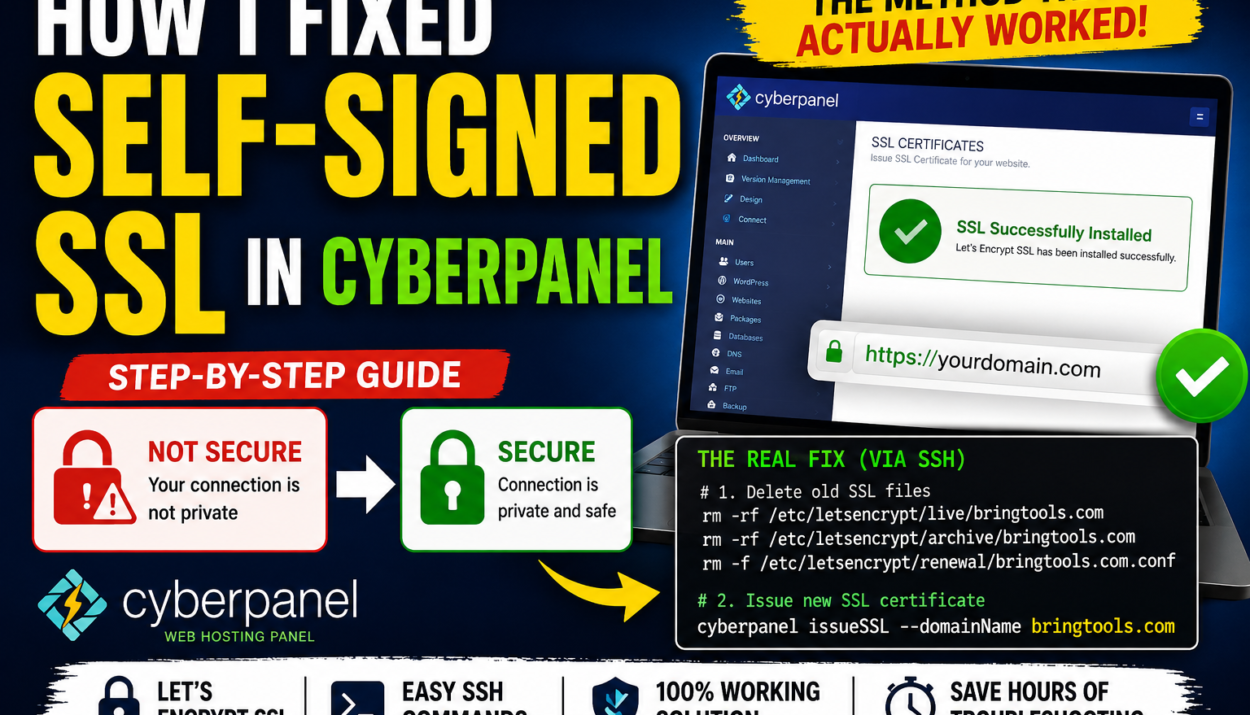
- Your connection is not private
- This site is not secure
- NET::ERR_CERT_AUTHORITY_INVALID
If you’re using CyberPanel, this problem can be frustrating.
You click Issue SSL inside CyberPanel, and it says:
SSL Successfully Installed
But your website still shows a self-signed certificate.
I personally faced this issue on my own website. I tried several solutions, but none of them worked. Eventually, I found a method that completely fixed the problem.
In this guide, I’ll show you exactly what happened and the exact commands I used to solve it.
What Is a Self-Signed SSL Certificate?
An SSL certificate protects your website and creates a secure connection between your visitors and your server.
When SSL works properly, visitors see:
- A padlock icon.
- HTTPS in the address bar.
- No security warnings.
A self-signed certificate is different.
It is created by the server itself rather than by a trusted certificate authority like Let’s Encrypt.
Think about it this way.
If you print your own ID card at home, other people may not trust it. The same thing happens with self-signed SSL certificates.
Because browsers do not trust them, visitors see warnings.
Symptoms of This Problem
You may experience:
- CyberPanel says SSL is installed.
- Browser still shows “Not Secure.”
- HTTPS is not working.
- The browser displays NET::ERR_CERT_AUTHORITY_INVALID.
- The website still uses the old certificate.
This was exactly my situation.
Why This Happens
Several things can cause this:
- Incorrect DNS records.
- Domain not pointing to the server.
- Cloudflare proxy enabled.
- Firewall blocking ports.
- Old SSL files still exist.
- OpenLiteSpeed is serving the old certificate.
In my case, the old SSL files were the real problem.
Before You Start
Make sure:
- Your domain points to your server’s IP address.
- Port 80 is open.
- Port 443 is open.
- DNS has finished propagating.
- Cloudflare proxy is disabled temporarily.
You can verify your DNS records at your domain registrar.
Example:
| Record | Value |
|---|---|
| A | Your Server IP |
| WWW | Your Server IP |
If the DNS records are incorrect, Let’s Encrypt cannot verify your domain.
The Method That Finally Fixed My SSL Problem
After trying several solutions, I discovered that CyberPanel still had old SSL files stored on the server.
Deleting those files and generating a new certificate solved the problem immediately.
Step 1: Connect to Your Server
Log in to your server through SSH:
ssh root@your-server-ip
Replace:
your-server-ip
with your actual server IP address.
Step 2: Delete the Old SSL Files
Run these commands:
rm -rf /etc/letsencrypt/live/bringtools.com
rm -rf /etc/letsencrypt/archive/bringtools.com
rm -f /etc/letsencrypt/renewal/bringtools.com.conf
Replace:
bringtools.com
with your own domain name.
These commands completely remove the old SSL certificate files.
Why Delete the SSL Files?
Sometimes CyberPanel keeps using old certificate files.
Even when you click “Issue SSL,” the server continues serving the self-signed certificate.
Removing the old files forces CyberPanel to generate a completely fresh certificate.
Step 3: Issue a New SSL Certificate
Now run CyberPanel’s official command:
cyberpanel issueSSL --domainName bringtools.com
Replace:
bringtools.com
with your own domain.
This command automatically:
- Verifies your domain.
- Contact Let’s Encrypt.
- Creates a new SSL certificate.
- Installs the certificate.
- Updates OpenLiteSpeed.
This is the method that fixed my own website.
Example
If your website is:
example.com
You would run:
rm -rf /etc/letsencrypt/live/example.com
rm -rf /etc/letsencrypt/archive/example.com
rm -f /etc/letsencrypt/renewal/example.com.conf

cyberpanel issueSSL --domainName example.com
Step 4: Restart OpenLiteSpeed
Although CyberPanel often reloads the server automatically, you can restart it manually:
systemctl restart lsws
This ensures the server loads the new SSL certificate.
Step 5: Enable Force HTTPS
Inside CyberPanel:
- Websites
- List Websites
- Manage
- Force SSL
This automatically redirects visitors from:
http://yourdomain.com
to:
https://yourdomain.com
Clear Your Browser Cache
Sometimes the browser stores the old certificate.
Try:
- Ctrl + Shift + R
- Incognito mode
- Another browser
- Another device
This can help confirm whether the problem is actually solved.
My Real Experience
On my website, CyberPanel kept displaying:
SSL Successfully Installed
But every browser still showed:
Your connection is not private
I checked:
- DNS records
- Firewall settings
- Cloudflare
- Browser cache
Nothing worked.
The actual problem was the old SSL files.
After deleting those files and running:
cyberpanel issueSSL --domainName example.com
The website immediately started using a valid Let’s Encrypt certificate.
The padlock appeared, and the warning disappeared.
Common Errors
Authorization Failed
Your DNS records may be incorrect.
DNS Problem
Your domain is not pointing to your server.
Connection Timeout
Port 80 is blocked.
Open the ports:
ufw allow 80
ufw allow 443
Self-Signed Certificate Still Appears
Restart OpenLiteSpeed:
systemctl restart lsws
Clear your browser cache.
How to Confirm SSL Is Working
Visit:
https://yourdomain.com
You should see:
✅ HTTPS
✅ Padlock icon
✅ No security warning
Click the padlock icon to verify that the certificate issuer is:
Let’s Encrypt
Recomendations
Self-signed SSL problems in CyberPanel can waste hours of troubleshooting.
Many tutorials recommend simply clicking “Issue SSL” again, but sometimes that is not enough.
In my case, the solution was:
- Delete the old SSL files.
- Run the CyberPanel IssueSSL command.
- Restart the web server.
If your website still shows a self-signed certificate, this method may solve the problem just like it solved mine.